Publish, update, and restore
A shared preview is temporary. For long-term access, select a domain in the static hosting console and complete formal publication.
The screenshots below focus on the relevant controls, leaving account details out of the frame. Hostnames are partially masked, keeping their structure and suffix visible. Use your own site and domain when following the steps. Select an image to enlarge it.
Before publishing
- Create and review the shared preview, including page interactions.
- Use an eligible NamesLink domain owned by the current account, with available hosting resources. The domain selector checks current eligibility.
- Choose a single-label subdomain, such as
www.example.comorblog.example.com. New external-domain bindings, apex domains such asexample.com, wildcards, and nested prefixes are currently unsupported.
example.com is reserved for documentation. Replace it with your own domain. A website name is a management label; renaming it does not change its address.
1. Select a domain and publish
- Open the Static hosting console, then open the intended site. You can also use Static Hosting in the console's website navigation.
- Select Bind domain. Choose a domain from My domains and enter a prefix, such as
www. - Check the complete hostname and wait for the availability check. Resolve occupancy or resource warnings first.
- Review the publication and DNS changes, approve publication, and complete the requested identity verification.
- Keep the same site and follow its domain, DNS, and HTTPS verification status. You can return to it later.
Conflicting records or bindings are not silently overwritten. If no eligible domain appears, check the signed-in account, domain ownership, and hosting eligibility. Do not delete unrelated DNS records to force a publication.
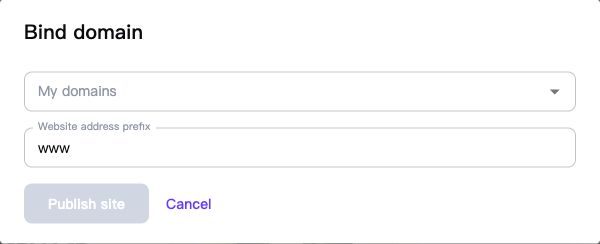
My domains chooses the domain you own. Website address prefix chooses the hostname within it: www with example.com means www.example.com. The publication button stays unavailable until the selection and checks are complete. The screenshot deliberately stops before selecting and submitting a domain.
2. Verify the actual website
An accepted request or a working temporary preview does not prove that formal publication is complete. Wait for the success state and formal URL. Open your complete hostname in a new window and check HTTPS, the homepage, images, and navigation.
If the console's embedded preview fails, use its open-website action to check the real address. An embedding restriction may affect only the console preview. See preview troubleshooting.
3. Update the same site
- Open the existing site and select Update site.
- Select the replacement HTML, ZIP, or output folder, or paste the new HTML.
- Check the editor's local preview, including desktop and mobile layouts. It disables scripts and network requests, just like the upload page; it cannot test full browser interactions.
- Select Publish update, review the destination, and complete the requested verification.
- Wait for successful publication, then open the same domain and check the actual changed content.
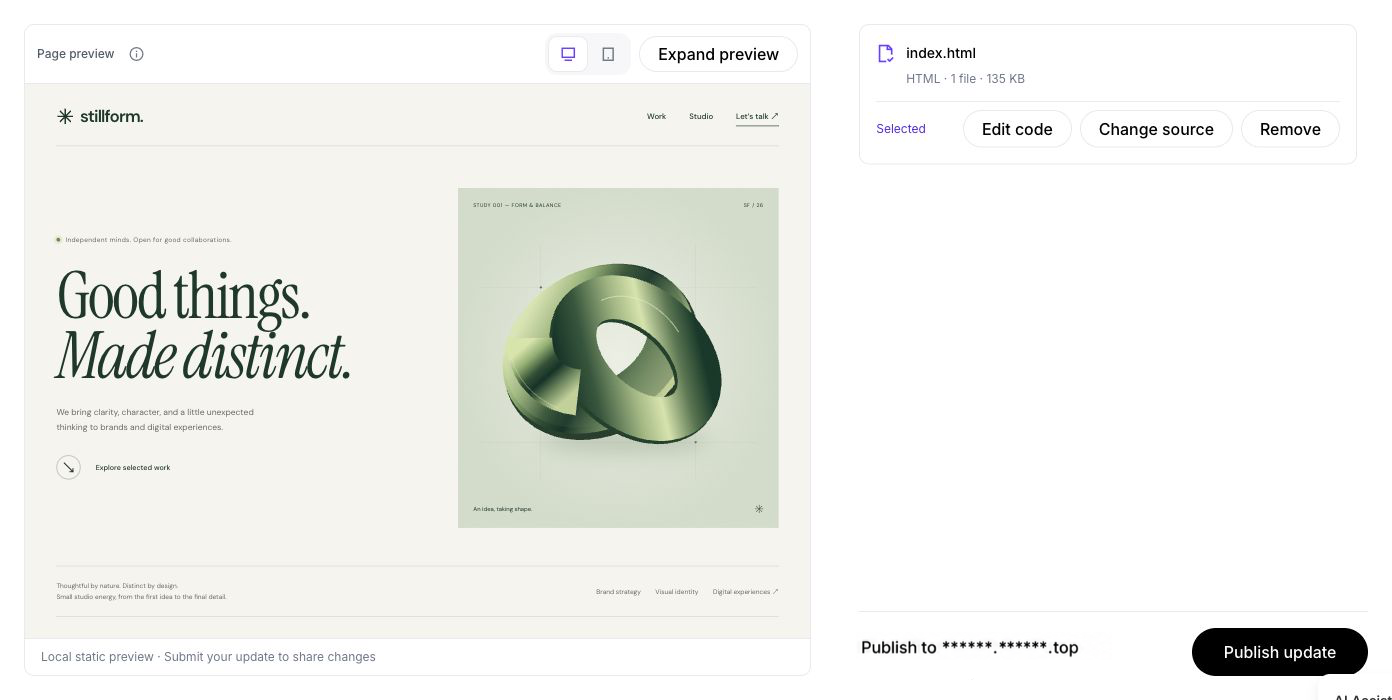
Choosing or editing files does not itself change the live website. The screenshot shows this preparation stage. Do not create another site for each update; publish the new content through the original site's update flow.
To test full interactions before changing the live site, use your local development server or the CLI's preview flow on the same site. Check the published URL again after the update.
Check the site and destination before each update. CLI users must also reuse the existing site ID; see CLI update steps.
4. Restore a retained version
Open Release history on the same site. The Current badge identifies the verified current release. Choose a retained successful release with Restore this version; do not infer the current version from the largest version number, because a previous restoration may have changed it.
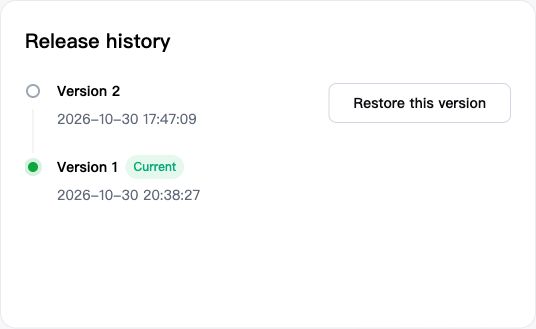
The confirmation names the exact domain and target version. Check both before confirming. Complete the requested verification, wait for this restoration operation to succeed, and open the domain to check the expected content.
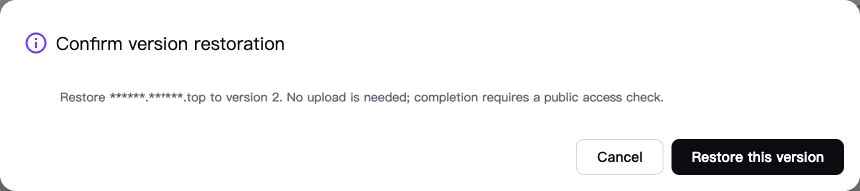
Restoration publishes the retained release through a new operation; it does not require uploading its files again. An expired old preview does not by itself prevent restoring retained history. Releases outside the retention range cannot be restored through this action.
5. Stop a website
Use Stop serving and unbind in site management and read the current confirmation before completing verification. Stopping a site is separate from deleting a domain. Check which binding and DNS records the operation will handle; do not manually remove other services' records.
Publication is taking a while
Return to the original site and follow its status and next action. DNS, certificates, or public verification may still be pending. Do not repeatedly submit new publications when the result is unknown.
For support, provide the site name, operation time and timezone, a masked status screenshot, and the site or operation ID through a private ticket. Never include passwords, keys, or verification codes.