Key Takeaway: Pointing a domain to a website is essentially telling the internet “this domain corresponds to that server” through the DNS system. You have two ways to do this: changing nameservers (delegating full DNS management to your host) or setting A/CNAME records (keeping DNS control while modifying specific pointers). According to Cloudflare’s 2025 Global DNS Report, over 72% of websites use A records to point directly to server IPs, while 28% of users choose to change nameservers for simpler all-in-one management. For beginners, the choice depends on how much control you need and how complex you want your setup to be.
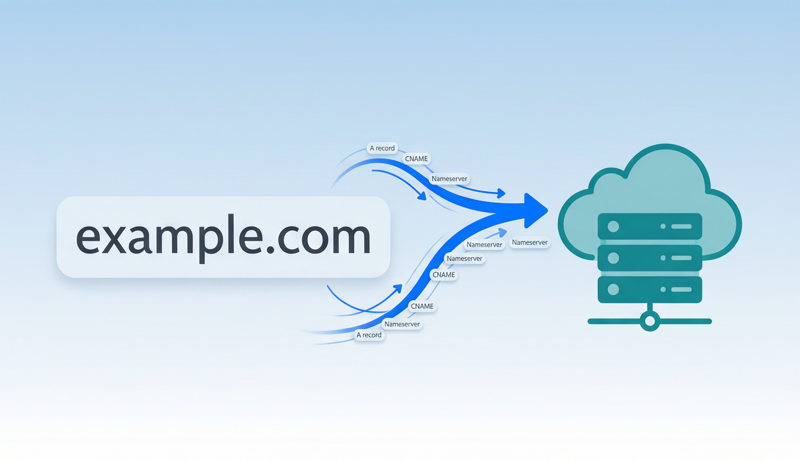
A domain and hosting are the two fundamental building blocks of any website—the domain is the address visitors type into their browser (like example.com), while hosting is the computer that stores your website files. After purchasing both, you need to connect them through DNS settings so the domain knows where to send visitors. This process is called “domain pointing” or “domain binding.”
This guide walks you through the entire process from domain registration to a live, accessible website, regardless of which hosting platform or domain registrar you use.
📊 Data Source: According to Verisign’s Q4 2024 Domain Name Industry Brief, global domain registrations have surpassed 360 million. W3Techs data shows Cloudflare DNS holds approximately 19.2% of the known DNS service market, with Namecheap’s FreeDNS at about 2.1%. DNS configuration has become a fundamental skill every website owner must master.
What Is Domain Pointing?
Domain pointing is the process of mapping your domain name to the IP address or hostname of the server hosting your website through DNS (Domain Name System) configuration. When a visitor types your domain into their browser, the DNS system routes the request to the correct server based on your pointing rules, and the server returns your website content.
Think of it this way: your domain is like a street address, and your server is the actual building. DNS pointing is registering the “address → building location” relationship in a universal directory. Without this step, the internet doesn’t know where to send requests for your domain, and visitors see a “site cannot be reached” error.
How Domain Pointing Works Technically
When someone types www.example.com in their browser, here’s what happens behind the scenes:
- The browser asks the local DNS resolver: “What’s the IP address for example.com?”
- The resolver queries the root nameservers →
.comTLD nameservers → your domain’s authoritative nameservers - The authoritative nameserver returns the A record (IP address) or CNAME record (alias) you configured
- The browser connects directly to that server via HTTP/HTTPS
- The server returns the web page content
This entire process typically takes just 20-100 milliseconds, but its accuracy depends entirely on whether your DNS configuration is correct.
Two Methods Compared
Before starting, understand the differences between the two main methods so you can choose the right approach:
| Factor | Changing Nameservers | Setting DNS Records (A/CNAME) |
|---|---|---|
| Control Scope | Delegates entire DNS management to host | Only modifies specific records, retains full control |
| Best For | Website and email both at the same host | Domain and hosting at different providers, or using third-party email |
| Difficulty | ⭐ Very simple, just replace 2 addresses | ⭐⭐ Moderate, requires understanding record types |
| Email Impact | ⚠️ May disrupt existing email | ✅ Doesn’t affect existing MX records |
| Propagation Time | 24-48 hours (usually 2-4 hours) | 1-4 hours (depends on TTL) |
| Flexibility | Lower, all subdomains follow | High, different subdomains can point to different servers |
| Recommended For | Complete beginners, all-in-one setups | Users with multiple services, developers |
Recommendation: If you’re building your first website and both hosting and email are with the same provider, go with nameserver changes—it’s the simplest and least error-prone option. If you already have business email (like Google Workspace or Zoho Mail), or need different subdomains pointing to different servers, use the A record/CNAME method.
Method 1: Changing Nameservers
Changing nameservers means delegating your domain’s entire DNS management to another party (usually your hosting provider or a DNS service like Cloudflare). After this change, all DNS records for that domain (A, CNAME, MX, TXT, etc.) are managed at the new nameserver location.
Step-by-Step Instructions
Step 1: Get Your Host’s Nameserver Addresses
Log into your hosting control panel and find the “DNS” or “Nameserver” information. Common hosting providers’ nameservers:
| Host | Nameserver 1 | Nameserver 2 |
|---|---|---|
| Cloudflare | xxx.ns.cloudflare.com | xxx.ns.cloudflare.com |
| SiteGround | ns1.siteground.net | ns2.siteground.net |
| Bluehost | ns1.bluehost.com | ns2.bluehost.com |
| Hostinger | ns1.dns-parking.com | ns2.dns-parking.com |
| Vercel | ns1.vercel-dns.com | ns2.vercel-dns.com |
💡 Each hosting provider has unique nameserver addresses. Always use the actual addresses shown in your hosting dashboard. Cloudflare assigns unique nameserver pairs per account.
Step 2: Update Nameservers at Your Domain Registrar
- Log into your domain registrar account (NamesLink, Namecheap, GoDaddy, etc.)
- Navigate to your domain’s management page and find “DNS Settings” or “Nameserver Management”
- Replace the default nameservers with the addresses provided by your host
- Usually you need to fill in 2 nameservers (some support up to 4)
- Save changes—some registrars may require email verification
Step 3: Wait for Propagation and Verify
After changing nameservers, DNS propagation across the globe may take 24-48 hours (typically 2-4 hours for most regions). Use whatsmydns.net to check DNS propagation status worldwide.
Important Considerations
- Email risk: If your domain currently has MX records for email, you’ll need to reconfigure them in your new DNS panel after changing nameservers, or email will stop working
- Don’t mix methods: Once you change nameservers, all DNS records at your original registrar become inactive—don’t configure records in both places
- Backup records: Before making changes, screenshot or export all existing DNS records so you can restore them in the new panel
Method 2: Setting A Records and CNAME Records
Keep your domain’s nameservers unchanged at your registrar and directly add or modify A records and CNAME records in the DNS management panel. This approach is more flexible and won’t affect your existing DNS records.
Step-by-Step Instructions
Step 1: Get Your Server’s IP Address
Log into your hosting control panel and find the server’s public IPv4 address (format like 203.0.113.50). If using platform services (Vercel, Netlify), they typically provide a CNAME value rather than an IP address.
| Hosting Type | Record Needed | Example Value |
|---|---|---|
| Dedicated Server/VPS | A Record | 203.0.113.50 |
| Shared Hosting | A Record | IP provided by host |
| Vercel | CNAME | cname.vercel-dns.com |
| Netlify | CNAME | your-site.netlify.app |
| GitHub Pages | A Record | 185.199.108.153 |
| Shopify | CNAME | shops.myshopify.com |
Step 2: Configure the Root Domain (@ Record)
- Log into your registrar’s DNS management panel
- Find the A record list (or add a new record)
- Host/Name: Enter
@(represents the root domain, i.e., example.com) - Record Type: Select
A - Value/Points To: Enter your server’s IPv4 address
- TTL: Set to 3600 (1 hour) or use the default value
- Save
Step 3: Configure the www Subdomain
In most cases, you’ll also want www.example.com to reach your website:
- Option A: Add an A record with Host
www, pointing to the same server IP - Option B (recommended): Add a CNAME record with Host
www, valueexample.com(this way www automatically follows the root domain’s pointer)
Step 4: Verify DNS Records
After saving, changes typically take effect within 1-4 hours. Verify using:
# Check A record in terminal
dig example.com A +short

# Check CNAME record
dig www.example.com CNAME +short

# Windows users can use nslookup
nslookup example.com
DNS Record Types Quick Reference
| Record Type | Purpose | Value Format | Use Case |
|---|---|---|---|
| A | Domain → IPv4 address | 203.0.113.50 | Root domain to server |
| AAAA | Domain → IPv6 address | 2001:db8::1 | IPv6-enabled servers |
| CNAME | Domain → another domain | cname.vercel-dns.com | Subdomains, platform hosting |
| MX | Mail server | mail.example.com | Receiving email |
| TXT | Text verification | v=spf1 include:… | SPF/DKIM/domain verification |
| NS | Nameserver | ns1.example.com | Delegating DNS management |
⚠️ Important Rule: The root domain (@ record) cannot use a CNAME record—this is a DNS protocol limitation (RFC 1912). If your platform only provides a CNAME value, you’ll need to use a DNS service that supports CNAME Flattening (like Cloudflare) or contact the platform for an A record IP.
Platform-Specific Instructions
WordPress + Self-Hosted
- Find your server IP in your hosting panel (cPanel/Plesk)
- Add an A record at your registrar:
@→ server IP - Add a CNAME record:
www→yourdomain.com - In WordPress admin, go to Settings → General and update Site Address to your domain
- Configure an SSL certificate (Let’s Encrypt is free and recommended)
Vercel / Netlify (Static Sites / JAMstack)
- In your Vercel/Netlify project settings, add a custom domain
- The platform provides the DNS records to configure (usually A record + CNAME)
- Add the records at your domain registrar
- Return to the platform and confirm domain verification
- SSL certificates are configured automatically
Shopify (E-commerce)
- Shopify admin → Settings → Domains → Connect existing domain
- Add an A record:
@→23.227.38.65 - Add a CNAME record:
www→shops.myshopify.com - Wait for Shopify verification (may take up to 48 hours)
GitHub Pages
- Repository Settings → Pages → Custom Domain → enter your domain
- Add 4 A records (GitHub Pages IP addresses):
- 185.199.108.153
- 185.199.109.153
- 185.199.110.153
- 185.199.111.153
- Add a CNAME record:
www→username.github.io - Check “Enforce HTTPS”
DNS Propagation and Troubleshooting
Why Is My Website Still Not Loading?
DNS changes don’t take effect instantly. Your settings need to propagate gradually to DNS servers worldwide (ISP caches, CDN nodes, etc.)—this process is called “DNS Propagation.”
Typical Propagation Times:
| Change Type | Expected Time | Maximum Wait |
|---|---|---|
| A record change (TTL=3600) | 1-4 hours | 24 hours |
| Nameserver change | 2-12 hours | 48 hours |
| New domain first resolution | Minutes to 1 hour | 2 hours |
| Change after lowering TTL | 5-30 minutes | Depends on old TTL |
Tips to Speed Up Propagation:
- 12-24 hours before planned DNS changes, lower the TTL to 300 (5 minutes) so cached records expire faster
- After confirming changes work correctly, restore TTL to 3600 or higher
- Using global Anycast DNS services like Cloudflare generally propagates faster than traditional DNS
Common Issues and Solutions
Issue 1: “This site can’t be reached”
- Verify A record/nameserver configuration (
dig yourdomain.com A) - Confirm server firewall allows inbound traffic on ports 80/443
- Confirm the host has a virtual host/site binding configured
Issue 2: www works but naked domain doesn’t (or vice versa)
- Check that both
@andwwwrecords are configured - Confirm both domains are bound on the server side
Issue 3: Seeing someone else’s website or a default page
- Shared hosting users need to “bind domain” in their hosting panel
- Dedicated server users need to configure
server_namein Nginx/Apache
Issue 4: Email stopped working
- After changing nameservers, check if MX records exist in the new DNS panel
- If MX records are missing, re-add them using values from your email provider
Best Practices and Common Mistakes
Do ✅
- Back up all DNS records before changes—screenshot or export CSV to prevent losing old configurations
- Verify step by step—change one record first, confirm it works, then modify others
- Use low TTL for transitions—lower TTL to 300 before big changes, restore after
- Configure both @ and www—ensure both access methods work correctly
- Set up SSL/HTTPS—after domain pointing is complete, always enable HTTPS encryption
Don’t ❌
- Don’t mix methods—don’t change nameservers AND A records simultaneously; pick one approach
- Don’t ignore email—before changing nameservers, confirm MX records won’t be lost
- Don’t mistype IP addresses—one wrong digit points to someone else’s server; always copy-paste
- Don’t be impatient—DNS propagation takes time; not loading within 2 hours is normal; don’t keep making changes
- Don’t delete TXT verification records—removing SPF/DKIM records breaks email authentication and service verification
Advanced: Using Cloudflare for Speed and Protection
Many webmasters migrate their DNS management to Cloudflare (free plan available) for faster DNS propagation, CDN acceleration, DDoS protection, and free SSL certificates:
- Register a Cloudflare account and add your domain
- Cloudflare automatically scans and imports your existing DNS records
- Change your domain’s nameservers to the pair assigned by Cloudflare
- After propagation, manage all DNS records from the Cloudflare dashboard
- Enable “Proxy” mode (orange cloud icon) to hide your real IP and activate CDN
Complete Beginner Workflow: From Zero to Live Website
If you’re a complete beginner, here’s the full path from nothing to a live website:
- Choose and register a domain—pick something short, memorable, and brand-relevant. If you’re still brainstorming, try the NamesLink AI Domain Name Generator—just enter your industry keywords to get creative domain name suggestions. Once you have candidates, use NamesLink Domain Availability Check to quickly verify registration availability across 1,500+ extensions in milliseconds.
- Choose hosting or a website platform—based on your technical ability: no-code (Shopify/Wix), low-code (WordPress), full-code (VPS + self-deployment)
- Complete domain pointing—follow this tutorial to connect your domain to your host using either the nameserver or A record method
- Install an SSL certificate—ensure your website is accessible via HTTPS (Let’s Encrypt is free)
- Upload website content—deploy your files or install a CMS
- Test and verify—access your domain from multiple devices and networks to confirm everything works
FAQ
Q1: Can I point a domain registered at NamesLink to any hosting provider?
Yes. Domain registration and hosting are independent services. You can register a domain at any registrar and point it to any host through DNS configuration. Your choice of registrar doesn’t limit your hosting options.
Q2: Should I use an A record or CNAME record?
If you have a specific server IP address (dedicated server/VPS), use an A record. If your platform provides a domain-format pointing value (like cname.vercel-dns.com), use CNAME. The root domain (@) must use an A record; subdomains can use CNAME.
Q3: How long after domain pointing until it takes effect?
A record changes typically take effect in 1-4 hours; nameserver changes usually take 2-12 hours. In extreme cases, full global propagation may take up to 48 hours. You can speed this up by lowering the TTL value beforehand.
Q4: Can one domain point to multiple servers simultaneously?
Yes. You can add multiple A records for the same domain (different IPs), and DNS will perform round-robin distribution—a basic form of load balancing. For professional load balancing, consider using a CDN or dedicated load balancer.
Q5: What’s the difference between domain pointing and domain forwarding?
Domain pointing (DNS Pointing) resolves the domain to a server IP at the DNS level—visitors see your domain in their address bar. Domain forwarding (URL Forwarding/Redirect) uses 301/302 redirects to send visitors to another URL—the address bar changes to the destination URL.
Q6: I changed DNS but still see the old website locally?
This is likely due to local DNS caching. Try: clearing browser cache, using incognito/private mode, flushing local DNS cache (macOS: sudo dscacheutil -flushcache, Windows: ipconfig /flushdns), or switching to DNS servers 8.8.8.8 or 1.1.1.1 for testing.
Conclusion
Domain pointing is a fundamental operation every website owner must master. Whether you choose to change nameservers (simple, all-in-one) or manually configure A/CNAME records (flexible, precise), the core goal is the same—making your domain correctly point to the server hosting your website.
Remember three key principles: back up before making changes, be patient waiting for propagation, and always configure both @ and www. Following this guide, even a complete beginner can connect their domain to their website in under 30 minutes.
References:
- Cloudflare, “How DNS Works,” 2025
- ICANN, “Domain Name System (DNS) Basics,” 2024
- Verisign, “Domain Name Industry Brief Q4 2024”
- RFC 1912 - Common DNS Operational and Configuration Errors
- W3Techs, “Usage Statistics of DNS Server Providers,” 2025